
User Guide: How to Use the Automated Website Status Checker

Welcome to the Automated Website Status Checker! This tool helps you monitor the status of your websites and get notified via email if any issues arise, such as when a site goes down or returns an error code like 404.
In this guide, we’ll explain each step for setting up the tool, including configuring the Config sheet and how the Logs sheet works.
Step 1: Set Permissions (One-Time Setup)
Before you begin, you need to grant the necessary permissions for the script to run. This is required so the script can check websites, send email notifications, and set time-based triggers.
To do this:
- Go to the custom menu FRH Website Status Checker.
- Select Set Permissions.
- Follow the prompts to grant the permissions requested.
This step only needs to be done once. Once permissions are set, you can continue with the rest of the setup.
Step 2: Configure the Config Sheet
The Config sheet is where you define the websites you want to monitor, the emails to notify when something goes wrong, and the interval for how often the checks should occur.
Note: If you make any changes to the Config sheet after the initial setup, you will need to reset the script using the Reset option from the menu. This ensures the new configuration is applied correctly.
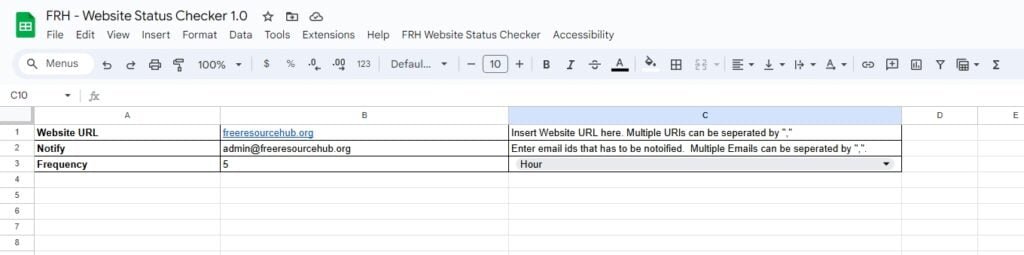
Website URLs (Cell B1)
In B1, list all the websites you want to monitor. You can enter multiple URLs, separated by commas. The script will check each website in this list at the interval you specify.
Example:
freeresourcehub.org, example.com, mywebsite.com
In this example, the script will monitor freeresourcehub.org, example.com, and mywebsite.com. Each website will be checked when the interval trigger is reached.
Notification Emails (Cell B2)
In B2, list all the email addresses you want to notify if a website goes down or returns an error code. You can enter multiple email addresses, separated by commas. If any issue is detected, the system will notify all listed recipients.
Example:
admin@freeresourcehub.org, support@example.com
Both admin@freeresourcehub.org and support@example.com will receive email notifications when an issue occurs with any monitored website.
Interval (Cells B3 and C3)
In B3, enter the numeric value of the interval at which the script should check your websites.
In C3, specify the unit of the interval. You can choose either:
Hour: Checks the websites every X hours.Day: Checks the websites every X days.
Example 1:
If you want the script to check your websites every 5 hours, enter:
B3: 5
C3: Hour
Example 2:
If you want the script to check your websites every 2 days, enter:
B3: 2
C3: Day
Summary of Config Inputs
- B1: List of website URLs separated by commas.
- B2: List of notification emails separated by commas.
- B3: Numeric value for the interval (e.g., 1, 2, 5).
- C3: Interval unit:
HourorDay.
Make sure to save the changes in your Config sheet once you’ve entered the values.
Step 3: Start the Website Check
Once your Config sheet is set up, you can start the monitoring process. To do this:
- Go to the custom menu FRH Website Status Checker.
- Select Start Check.
This will initiate the first check immediately, and subsequent checks will run at the interval you specified in the Config sheet (e.g., every 5 hours or every 2 days).
Step 4: Logs Sheet Overview
The Logs sheet keeps track of every status check performed on your websites. Each time the script runs, it logs the result in this sheet, including whether the website is up or if it returned an error.
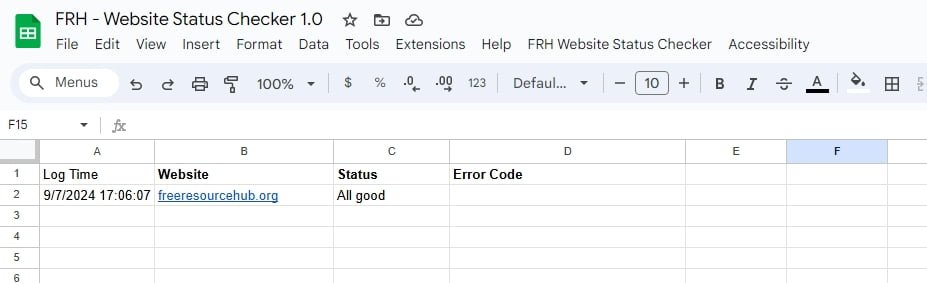
Columns in the Logs Sheet
- Timestamp: The date and time when the status check was performed.
- Website: The URL of the website that was checked.
- Status: The result of the check. If the website is accessible, this column will show All good. If there was an issue, it will show Error.
- Error Code: If the website returned an error (e.g.,
404for “Not Found”), the error code will be logged here.
Example Logs Entry
| Timestamp | Website | Status | Error Code |
|---|---|---|---|
| Sat Sep 05 2024 17:00:14 | freeresourcehub.org | All good | |
| Sat Sep 07 2024 17:00:14 | freeresourcehub.org | Error | 404 |
The Logs sheet makes it easy to see exactly when checks occurred and what the results were. If you notice any issues, you can refer back to this sheet to track when the problem began.
Step 5: Resetting the Script (When Changes Are Made)
If you make any changes to the Config sheet (such as adding new websites or changing the interval), you need to reset the script. This ensures that any new configuration is applied.
To reset the script:
- Go to the custom menu FRH Website Status Checker.
- Select Reset.
This will clear the stored values and reset any existing triggers. After resetting, you can start the website check again by following Step 3.
Note: Resetting the script does not delete data from the Config or Logs sheets. It only affects the stored properties and triggers.
Menu Options
In addition to the Config sheet, the script provides several useful options in the custom menu:
Set Up
- Set Permissions: Click this to grant the necessary permissions for the script to run, such as sending emails and checking websites. This is a one-time setup.
- Reset: This resets the script by deleting all stored properties and clearing triggers. However, it does not delete any data from the Config or Logs sheets.
Start Check
- Start Check: This option manually triggers the website checker. The first check will run immediately, and subsequent checks will follow the interval specified in the Config sheet.
Log Settings
- Enable Log: Enables detailed logging for tracking every step of the script execution in the Google Apps Script execution log.
- Disable Log: Disables logging to stop detailed tracking of script execution.
Other Options
- User Guide: Opens a detailed user guide in a new tab with instructions on how to use the Automated Website Status Checker.
- Check for Updates: Checks if there’s an updated version of the script available and notifies you if you can install it.
- Feedback / Bugs: Opens a form where you can report any issues or provide feedback on the tool.
- About Free Resource Hub: Opens the official Free Resource Hub website.
Final Notes
The Automated Website Status Checker is a powerful tool that helps you keep track of your websites’ availability. By configuring the Config sheet with the correct URLs, emails, and intervals, you can set up automatic checks and receive notifications if any of your websites go down.
Make sure to use the Logs sheet to keep track of all checks and refer to it when troubleshooting any issues. The menu options provide easy control over logging, checking for updates, and resetting the script if necessary.
If you have any questions, feel free to check the User Guide from the menu or submit feedback through the provided form.
Version Log

Version 1.0 - 07/09/2024 (Created based on idea from - Venkat (N) Krishnan | Principal Trustee, India Welfare Trust)
- Initial release with support for multiple website URL monitoring.
- Customizable interval settings (hourly or daily) using Google Sheets.
- Automatic email notifications for website errors (e.g., 404 errors) with actionable suggestions.
- Detailed logging of website status checks, including timestamps and error codes.
- Easy setup and one-time permission granting for email and URL fetch functions.
- Flexible reset option to reconfigure settings without affecting logs.